
01 - October - 2011 - Checking the kit (twice)
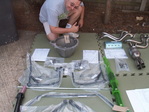
Every one asks what is in the kit, and i can honestly say, that there is ALOT in this kit. it took nearly 8 hours to check items off, The task sounds really simple, but the reality is that there are a few complications.
1) the manual (which has photo's in it of only the larger items) is a generic manual, and therfore what you get is not exactly what is in the manual
2) the check list (which we did not find until we were half way through) has a description field of about 30 characters, and has every component on it, including all the ones that are pre fitted to the chassis.
3) terminalogy - some of the termonolgy on the checklist does not match that in the manual, or from my previous experiences of playing with cars (be that 20 years ago). so matchin items is a bit hit or miss.
4) Caterham themselves - here is the positive, they have been supper helpful and the couple of phone calls has meant that i am confident that anything that i missed or got wrong when i cheked it off will be corrected without fuss, maybe a phone call, but without any quibble or drama. (the downside... they arnt there at weekends, so keeping notes of questions is a must).
06 - October - 2011 - Front suspension and steering rack
Steering Rack and Front suspension - other than the couple of points i have raised in the build tips (steering rack bolts and SVA covers and front light stands) , there is not much to say other than, it is fairly straight forward to build (so far) as it is pretty much as the manual suggests. I would advise that the car really does need to be protected properly, as without the masking tape and cardboard there is a good chance that you will mark the car.
In addition when doing the tightening of the wishbone bolts it is worth having a second pair of hands to hold the spanner or the wishbone. it will help to stop the torque wrench slipping and causing any damage. I will say i managed it on my own, but was very cautious about the wrench slipping.
In addition when doing the tightening of the wishbone bolts it is worth having a second pair of hands to hold the spanner or the wishbone. it will help to stop the torque wrench slipping and causing any damage. I will say i managed it on my own, but was very cautious about the wrench slipping.
14 - October - 2011 - Gearbox and Engine Assembly
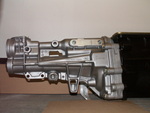
The Gearbox and Engine are prepped ready prior to installation into the car, First the gearbox was attached to the bell housing (took a couple of days whilst i waited for the RTV silicone sealant to arrive), bit no issues here. Then the pneumatic clutch release bearing and then the bell housing and gearbox were assembled on to the engine.
Issue no1 - starter motor bolts were different from the manual..
Issue no2- the J-hose, the description in the manual is not clear and since the racing car does not have a heater, it
wasn’t clear, so Caterham have sent some pictures of the way that the academy car hoses need to be attached.
Issue no1 - starter motor bolts were different from the manual..
Issue no2- the J-hose, the description in the manual is not clear and since the racing car does not have a heater, it
wasn’t clear, so Caterham have sent some pictures of the way that the academy car hoses need to be attached.
15 - October - 2011 - Engine installation

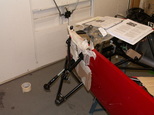
This is us putting in the Engine and gearbox, a few issues here was clearance of the car for the hoist and the height of the ceiling... it wasn’t easy but we managed to get the hoist high enough and the car low enough to clear the front of the vehicle.
Lining the mounting bolts was not that easy, and it was actually easier to take one of the mounting - chassis bolts out to get the bolt into the rubber mounting from the engine mounting bracket on the left hand side of the engine. We then used brute force to line mounting bush up to the chassis.
The next challenge was getting the gearbox centred into the tunnel. Again brute force and a small block of wood were used to get and keep the gearbox centred whilst all the engine mounting and gearbox mounting bolts were tightened and torqued.
the gearbox filler plug is going to be a real challenge when it comes to filling the gearbox with oil, there is so little space to get even the shortened Allen key into the hole, that it may be worth drilling a whole in the passenger floor well to get better access (and then using a grommet to stop the water from coming in) - that is a decision for later in the build i think.
I want to say a big thank you to Andrew McDonald, Geoff Daly and my wife who helped to move the heavy engine and gearbox into the car without them it would have taken a lot more time and a lot more pain (well maybe not hey Andrew?).
